Many of the stock agencies like iStockphoto and Shutterstock do not currently support embedding of a true alpha channel in their stock footage due to the fact that the codecs that allow for it would produce much larger file sizes. In order to work around this many stock video contributors include an alpha mask sequence (correctly called a luma channel) as part of their video clip that contains the clip's transparency. This short tutorial will explain how to use that luma channel so that you can utilize this transparency in your own project. I will use Adobe Premiere to explain how to do this, but the principles will be the same for other editing packages like FCP, sony Vegas or compositing packages like Apple Motion or After Effects. If you understand the principle you can easily apply this concept in another software package.
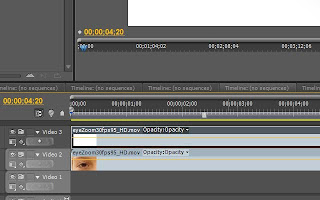
1) Cut the clip into 2 equal sequences - the first section of the video will typically contain the RGB color information and the second section will typically contain a grayscale luma channel. You will need to cut the clip into 2 clips of equal length by cutting at the beginning of the luma channel. This will typically be slap bang in the middle of the clip and will be the first frame that lacks color information and is only grayscale containing only white, black and gray elements). It's a good idea to keep a layer underneath this open for you own footage that you will add at a later stage, which is why in Premiere I have the clip on the "Video 2" layer, keeping "Video 1" open for my own footage to be added later.
 |
| The Luma channel will only contain grayscale elements |
 |
| The RGB section of the clip will contain color information |
 2) Now place the Luma matte that you have cut in the previous step (the second section of video) on a new layer above the RGB video. It should be is perfectly aligned to the beginning and end of the RGB video layer underneath. I have placed this on layer "Video 3"
3) Switch off visibility of this new layer that contains the luma grayscale channel. You don't want to display this layer you simply want to use it's luminescence to describe the transparency of the RGB sequence. You should again see the original RGB section of the clip displaying in the video monitor.
4) Now place a "Set Mask" effect on the footage / layer that contains the original RGB channel. This may be called something else in your editor or composting package and you may have to Google what the effect might be called. In Adobe Premiere you simply drag and drop the effect which is found in the effects window under "Video Effects > Channel > Set Matte" onto the clip in the timeline. Make sure you are applying this effect to the RGB clip and not the Luma clip.
5) Use the following settings for the Set Matte effect:
- Take Matte from: (here you specify the layer that contains the luma matte, in this case "Video 3")
- Use For Matte: (select "Luminence" from the drop down"). See the pic below:
6) Finally place your own footage in a layer underneath both of these layers (in this case on layer "Video 1):
In this particular case because this clip is a transition I have aligned my own footage towards the end of the clip but you will align your footage as it suits the specific effect.
NOTE: To use this transition in reverse might not be as simple as time-reversing the layers with the above setup because the software might get confused and not take into account the time reversal in conjunction with the set matte effect. In this case you can skip step 6, create a new sequence and use the eye-zoom sequence as a layer above your own footage in this NEW sequence. Then time reverse the eye-zoom layer in this new sequence by right clicking the layer, selecting "Speed / Duration" from the popup and checking the option "Reverse Speed"
Alternatively, you could also render each of the clips out in reverse and use these new clips to create a zoom out effect with steps 1 to 6.
Check out this video to see this tutorial in action:
Purchase this Eye Zoom Transition stock footage clip used in this tutorial from iStockPhoto.com
You can also purchase this Eye Zoom Transition pre-built into an easy to customize After Effects template that has comps for zooming in and out from Pond5
Here's another example of an "alpha mask" that you might like. In this case one uses the luma matte to expose one's own background footage and then one can add an animated scrolling text layer to create a news ticker effect:


No comments:
Post a Comment